 Responsive Maintenance
Responsive maintenance is unplanned, reactive work - eg dripping taps, blocked sewers or drains, to restore an item or area to an appropriate standard.

Please refer to the Works orders procedures, Gas and electrical procedures, Check and report procedures and Maintenance accommodation standards.
View property details ( Search and View Property or Complex Details) to assess request for maintenance as per the Maintenance accommodation standards.
Raise a work order ( Raise a Works Order).
Please refer to the Works orders procedures, Gas and electrical procedures, Check and report procedures and Maintenance accommodation standards.
 CAUTION - Works orders with Priority 0 (P0) cannot be varied.
Only complete the relevant steps below.
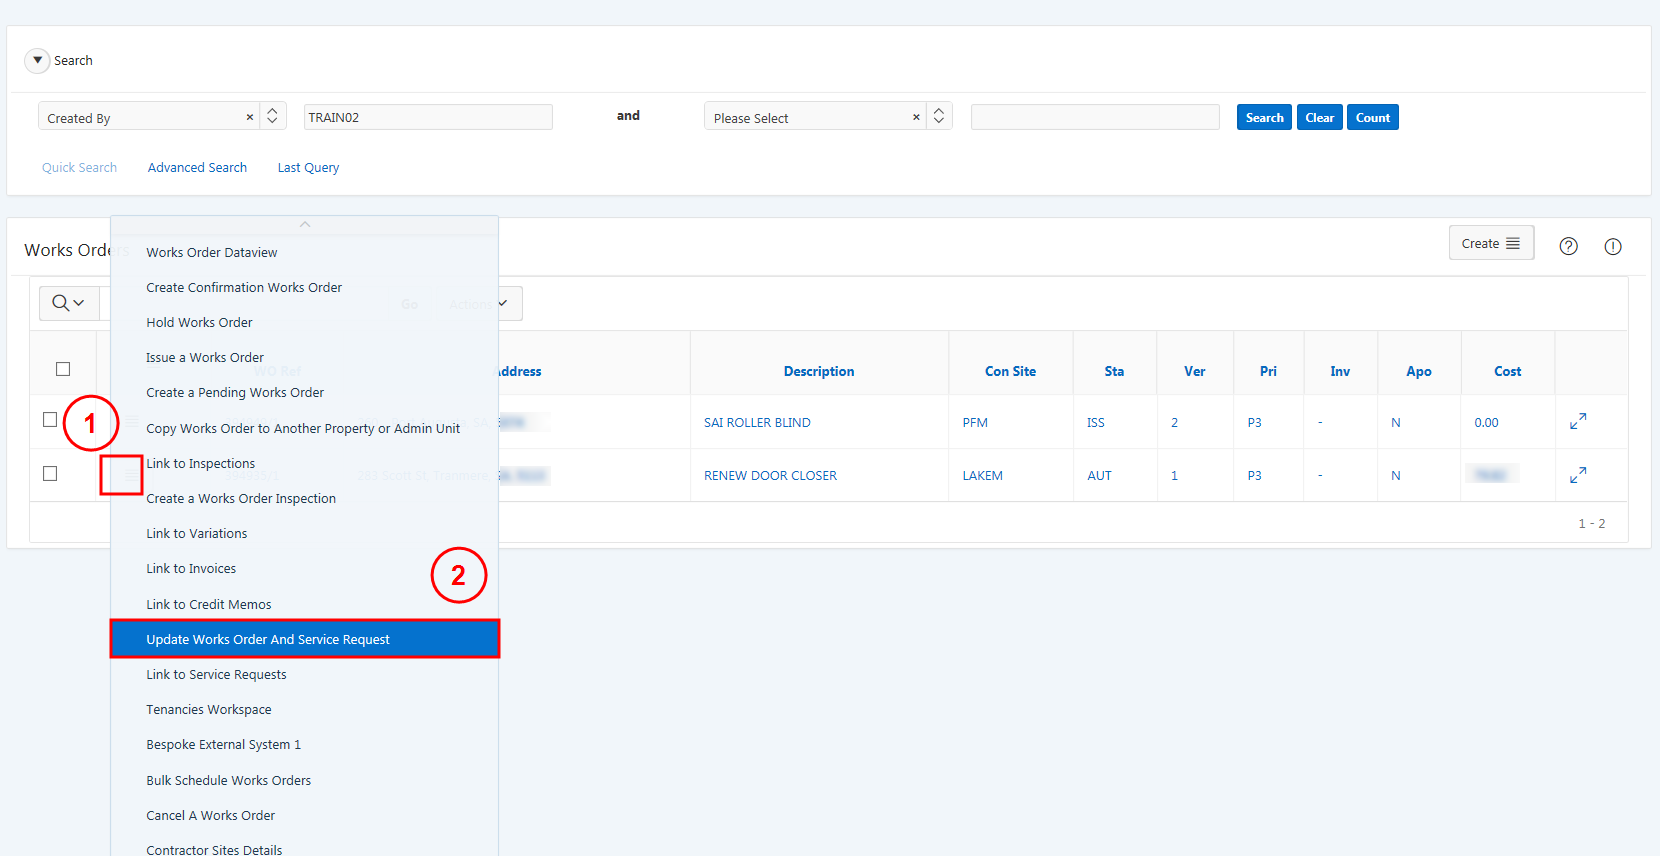
Search for the relevant Works Order ( Search and View a Works Order).
Select the Row Action Icon next to the Works Order and select Update Works Order and Service Request.
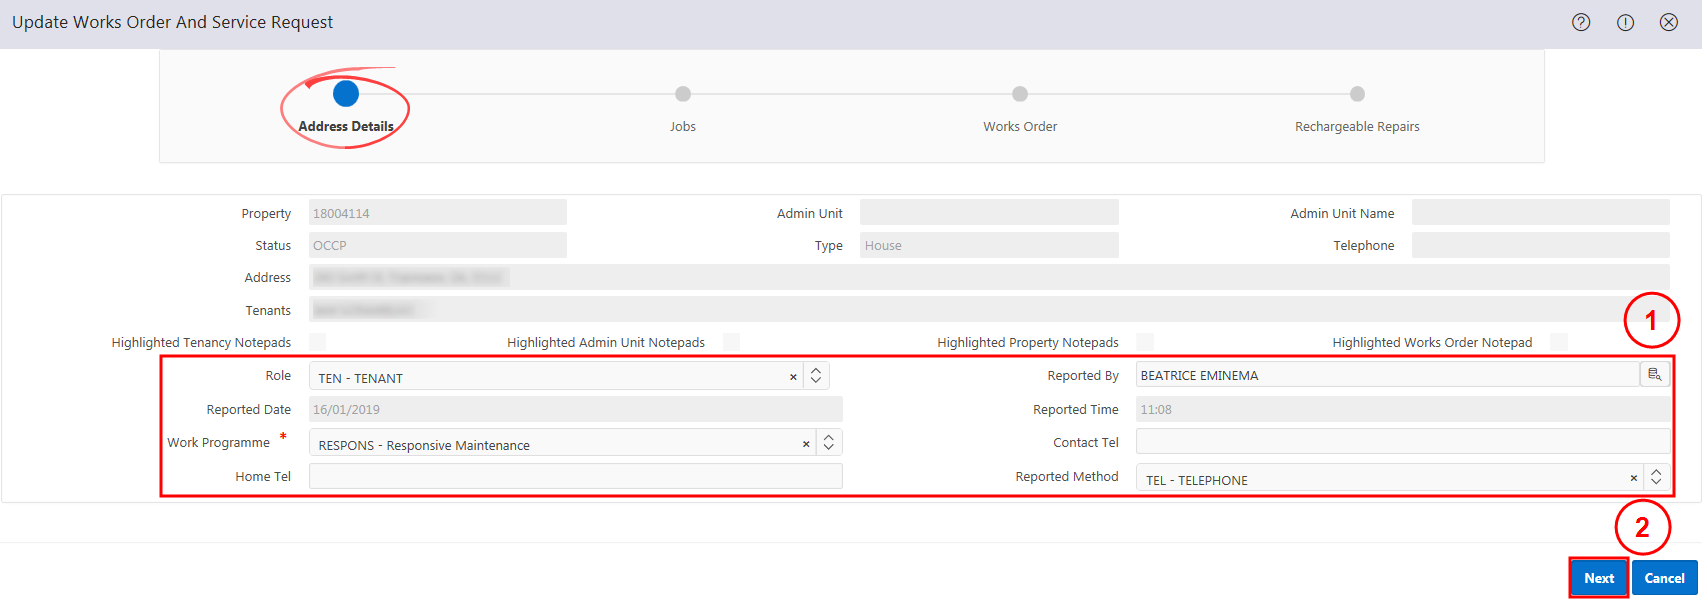
On the Address Details step, review relevant details and update as required. Select Next.
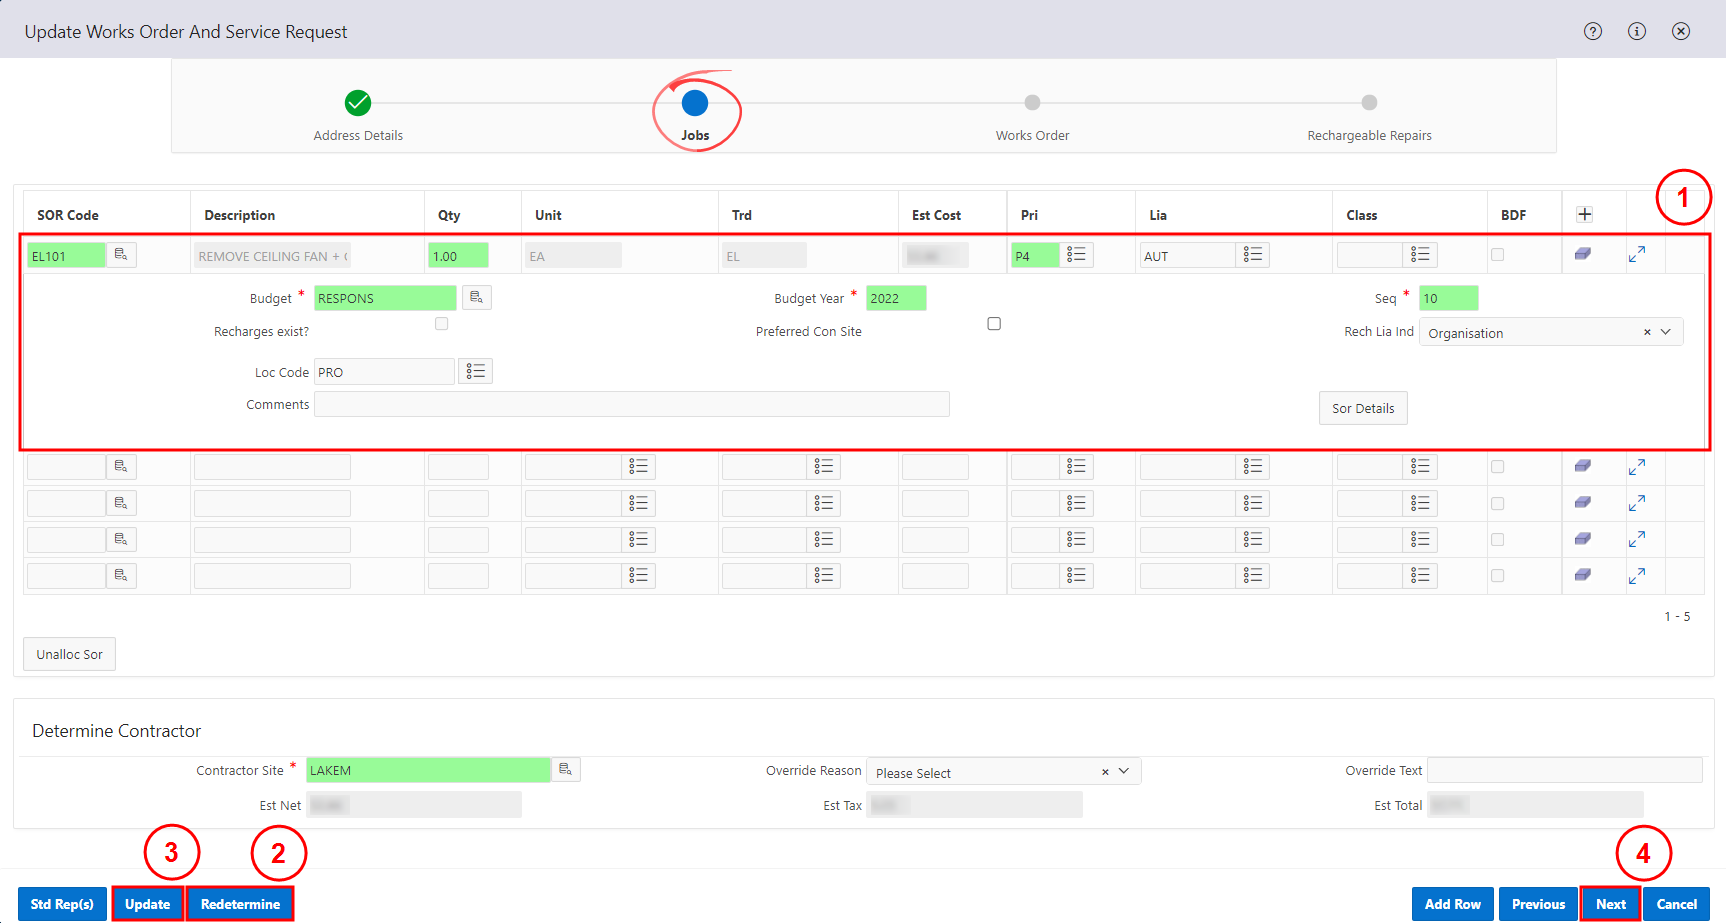
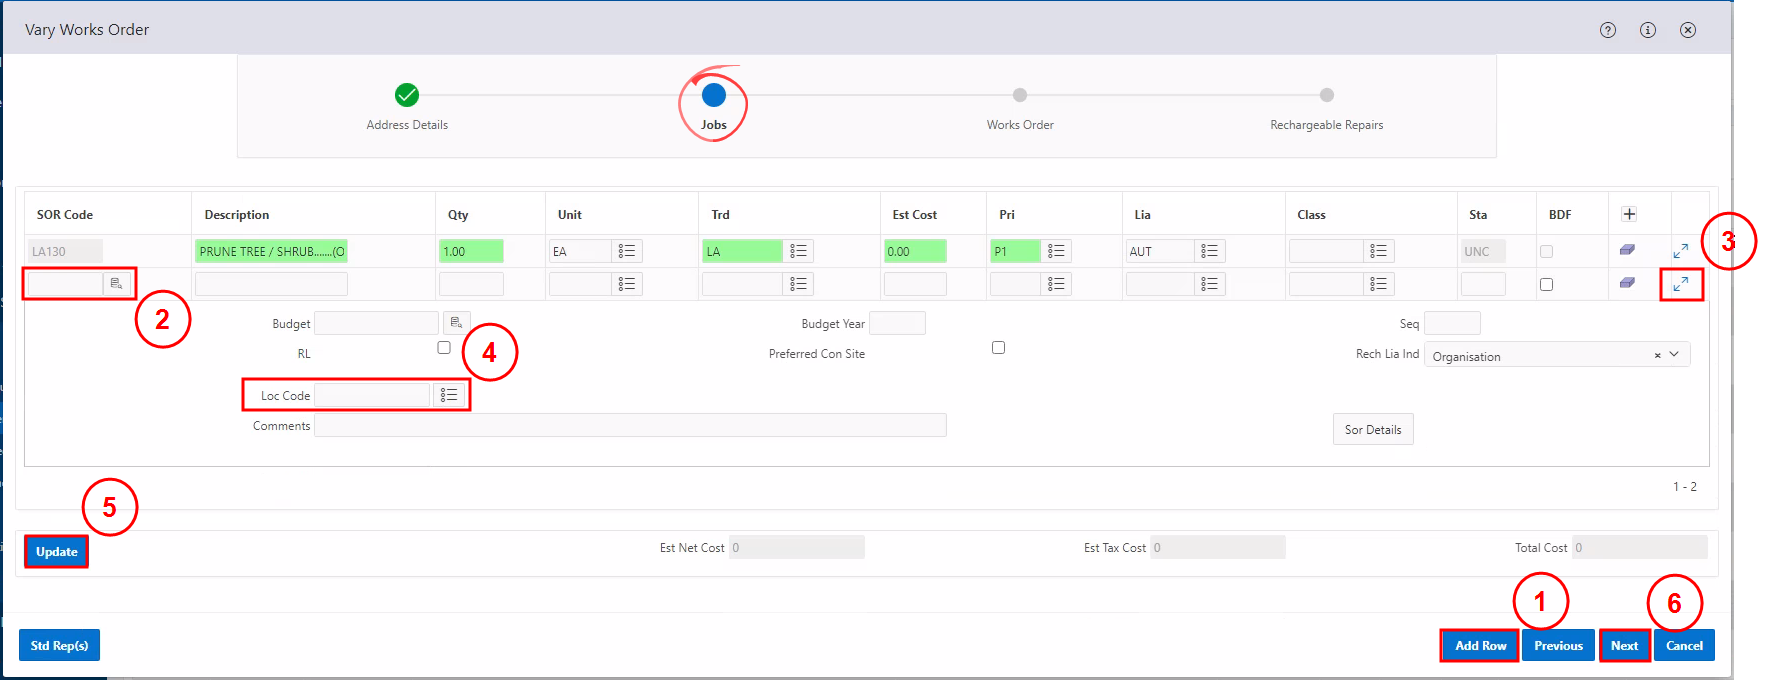
On the Jobs step, make the relevant changes to the existing Work Item. Select Redetermine. Select the location from the Loc Code field and select Update. Select Next.
CAUTION - If multiple SOR pages are being updated, select Update for each individual SOR page.
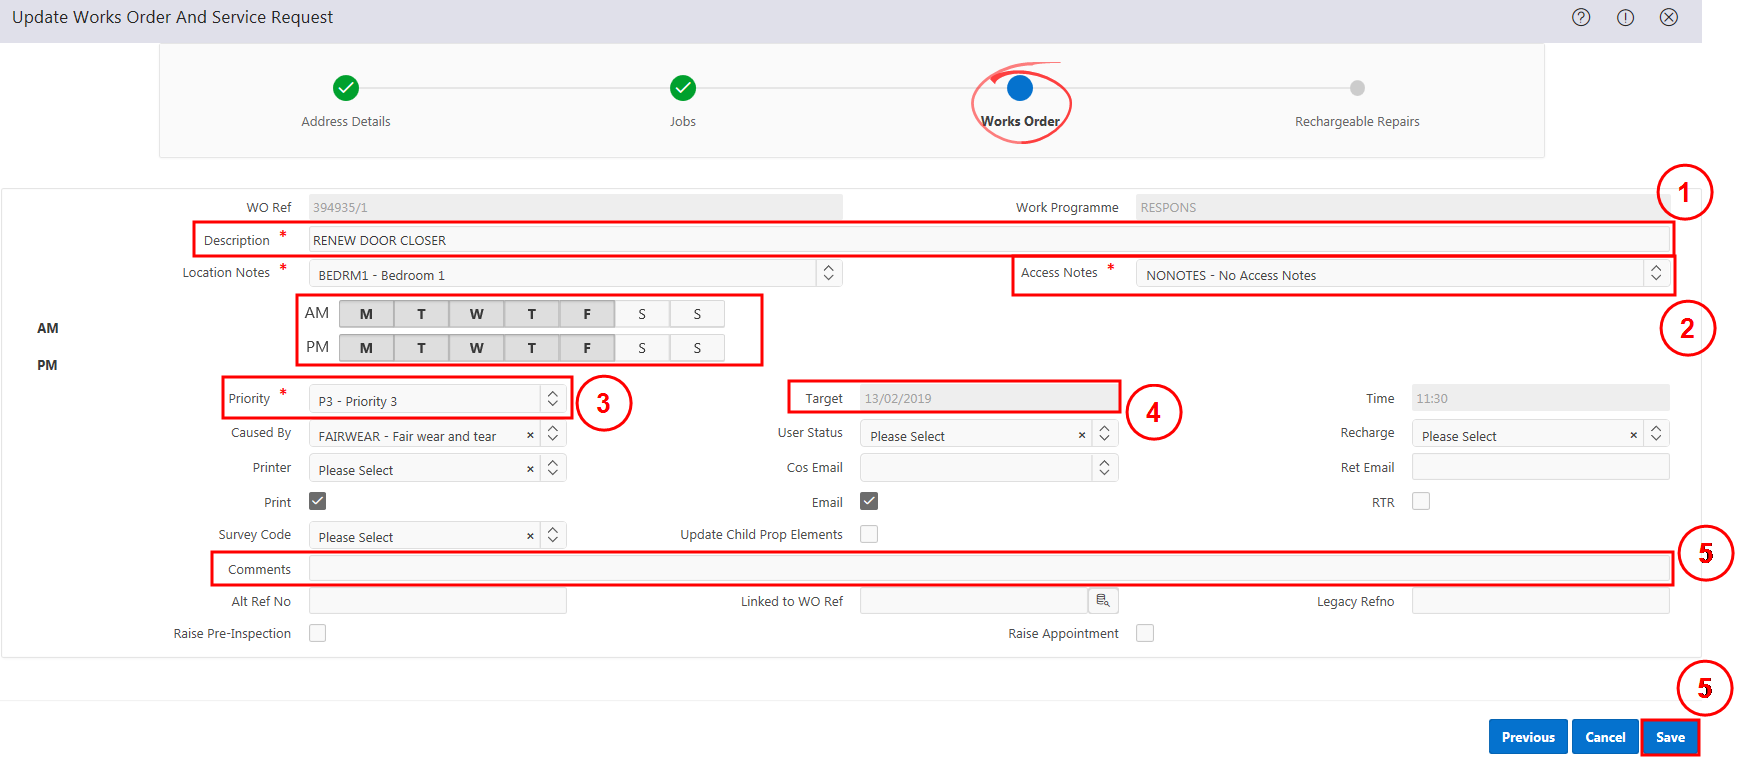
On the Works Order step, review and update the Description, Access Notes, Priority, Target or Comments where required. Select Save or Next.
CAUTION - Please ensure no personal information including names and phone numbers are entered in the Description field. Any comments entered here will be visible on the tenant's Housing Connect account.
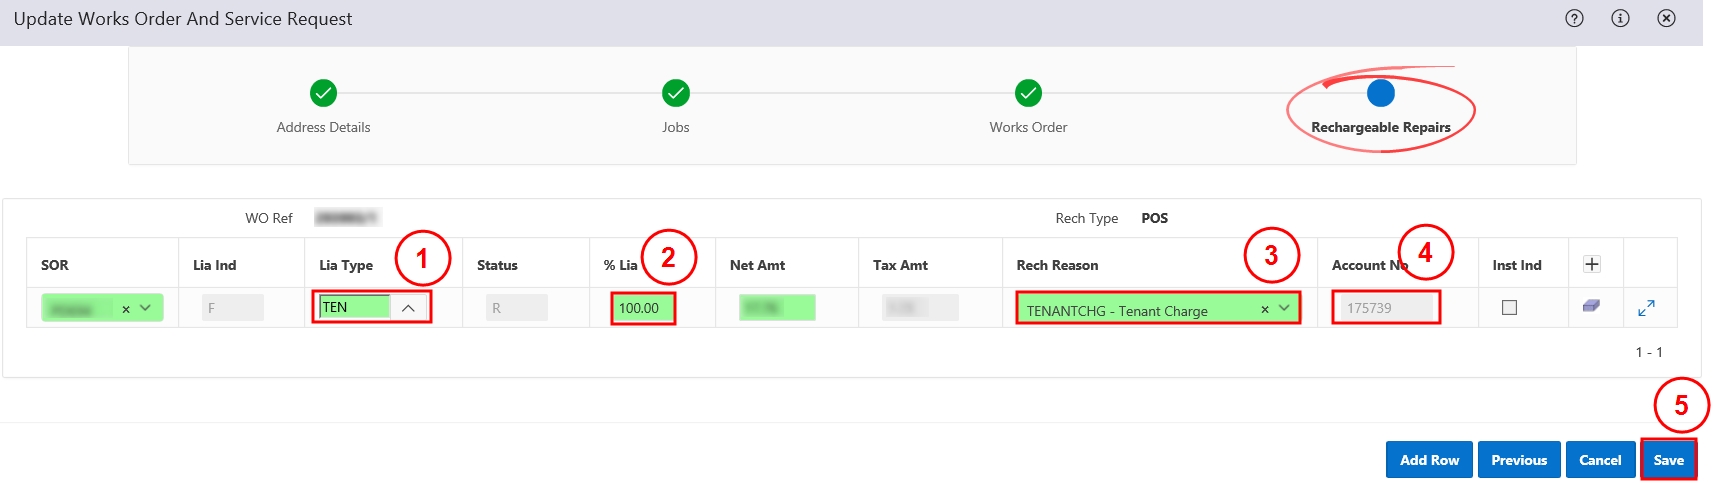
On the Rechargeable Repairs step, review and update the Lia Type, % Lia, Rech Reason or Account No where required. Select Save.
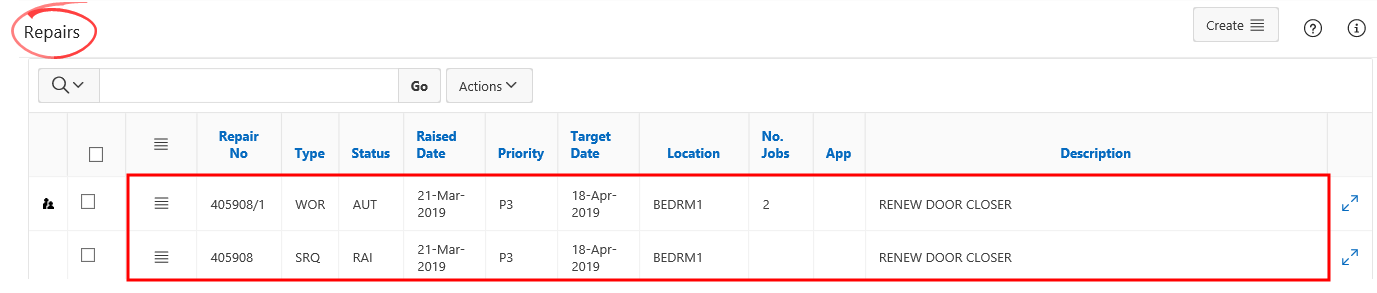
The Work Item has now been updated and displayed in the Repairs region.
Search for the relevant Works Order ( Search and View a Works Order).
Select the Row Action Icon next to the Works Order and select Update Works Order and Service Request.
On the Address Details step, review relevant details and update as required. Select Next.

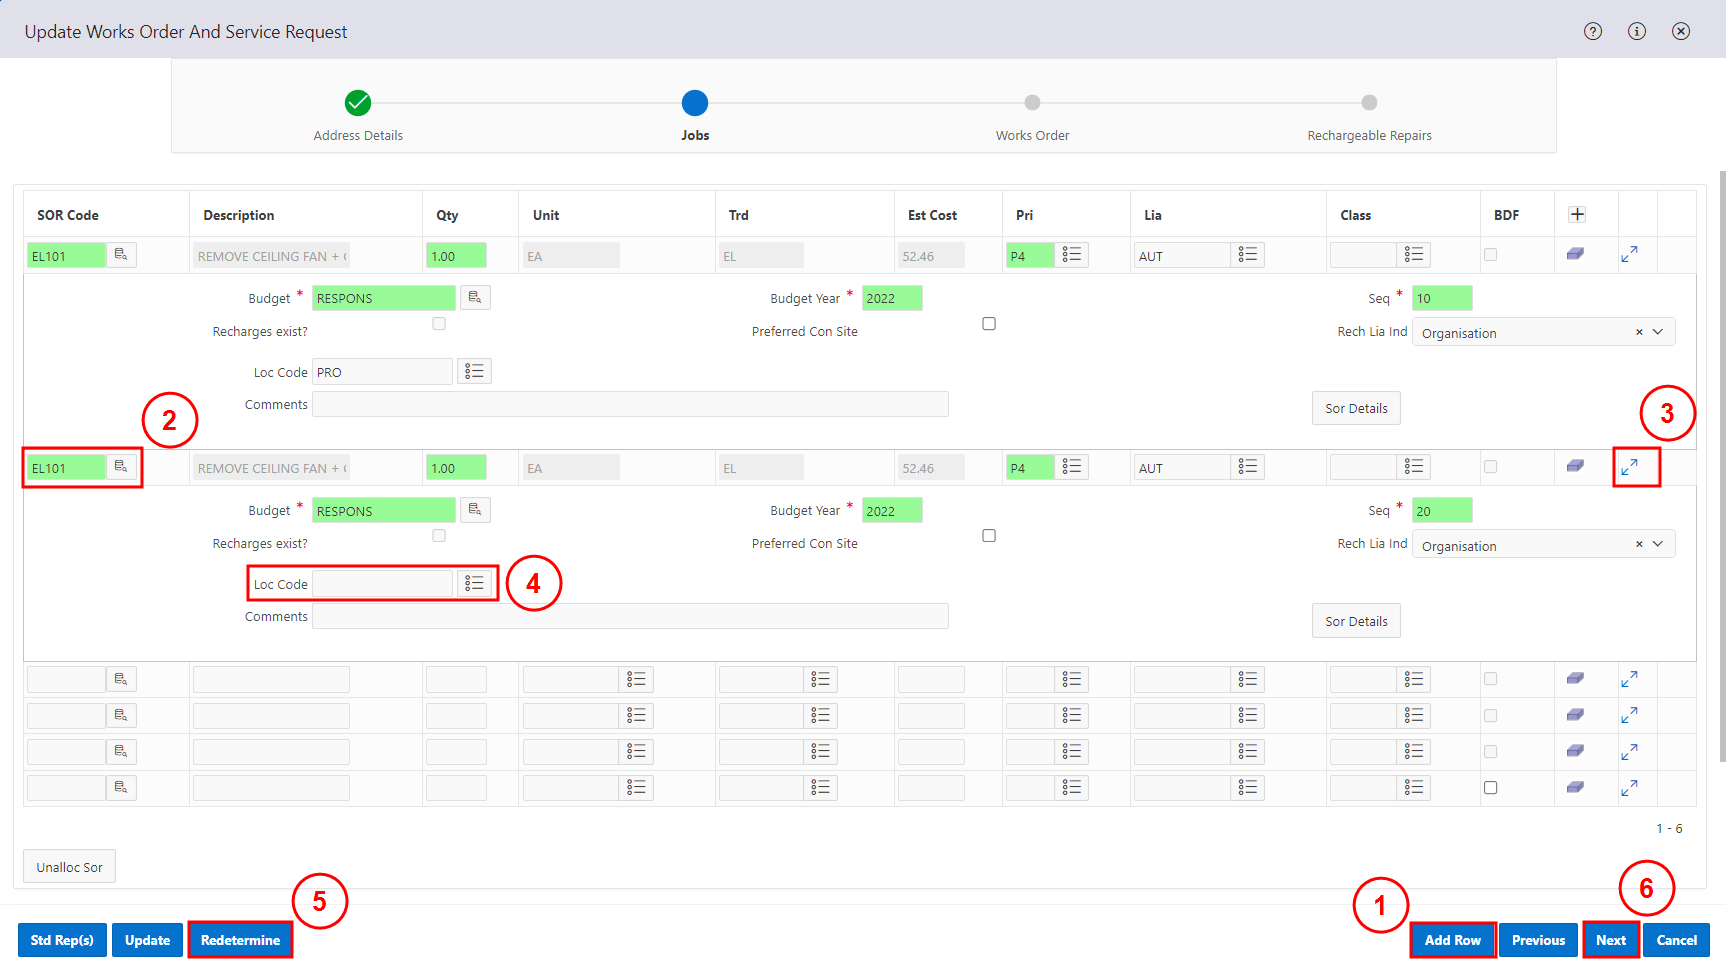
On the Jobs step, select Add Row. Enter or search the SOR Code in the new row. Select the Expand Icon to expand the added Work Item and select the location from the Loc Code field. Select Redetermine, then select Next.
On the Works Order step, review and update the Description, Access Notes, Priority or Comments where required. Select Save or Next.
CAUTION - Please ensure no personal information including names and phone numbers are entered in the Description field. Any comments entered here will be visible on the tenant's Housing Connect account.
On the Rechargeable Repairs step, review and update the Lia Type, % Lia, Rech Reason or Account No where required. Select Save.
The new Work Item has been added to the Works Order and is displayed under the Repairs region.
Only complete the relevant steps below.
CAUTION - Works orders with Priority 0 (P0) cannot be varied.
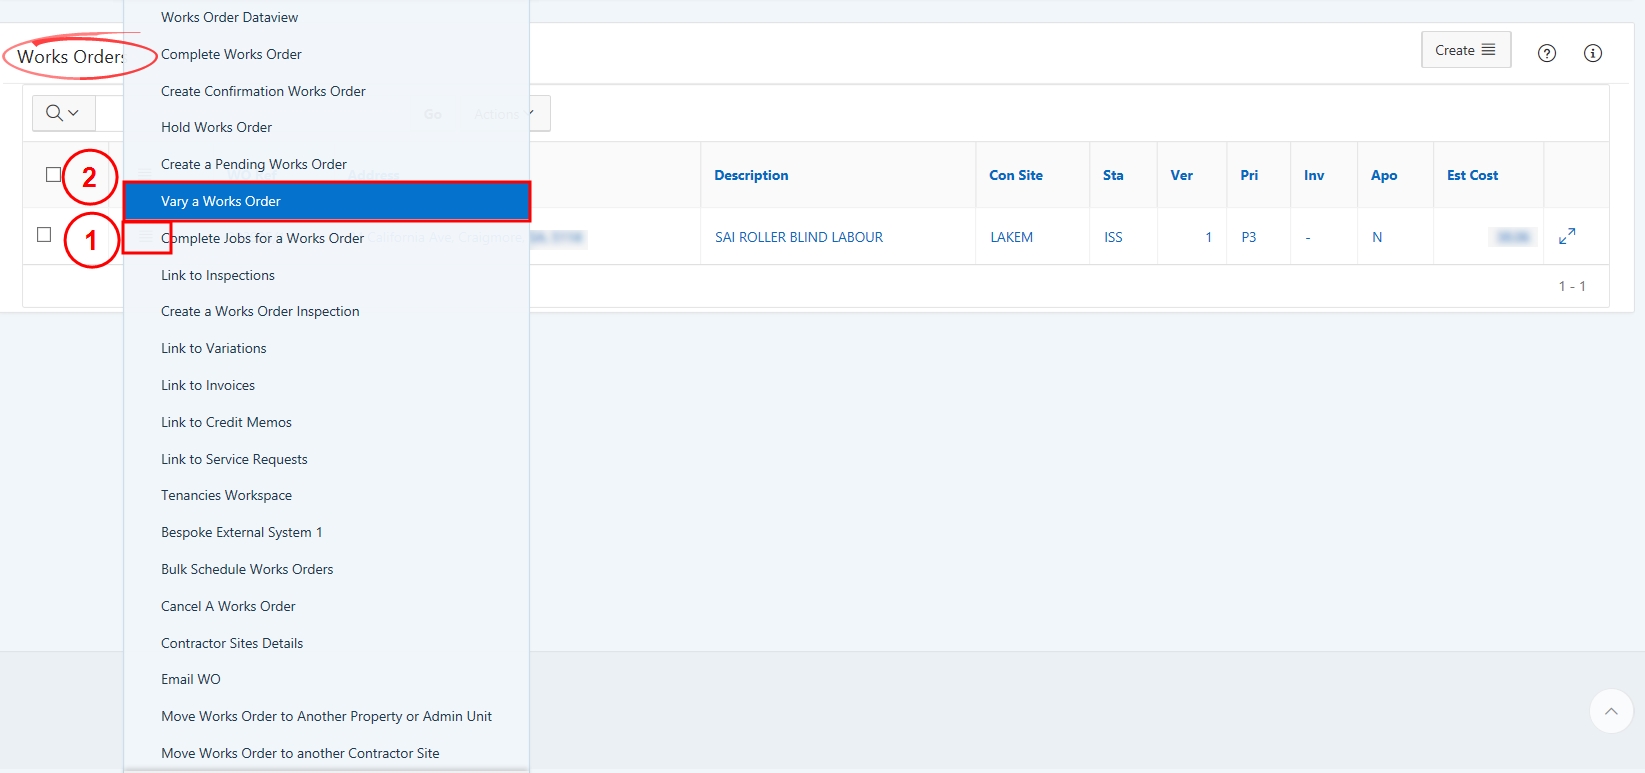
Search for the relevant Works Order ( Search and View a Works Order).
Select the Row Action Icon next to the Works Order and select Vary a Works Order.
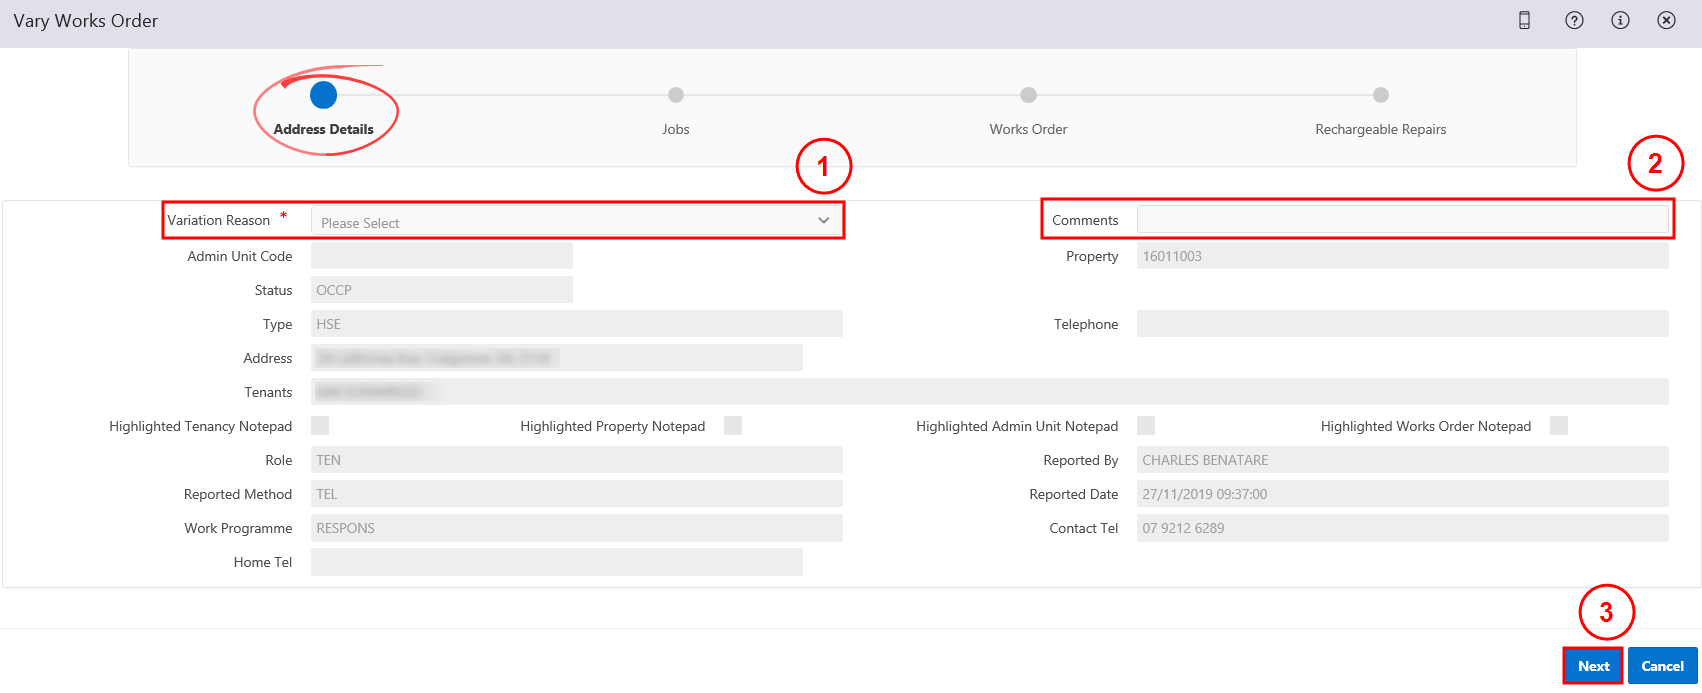
On the Address Details step, select the reason for the variation from the Variation Reason drop-down. Enter any additional notes in the Comments box, then select Next.
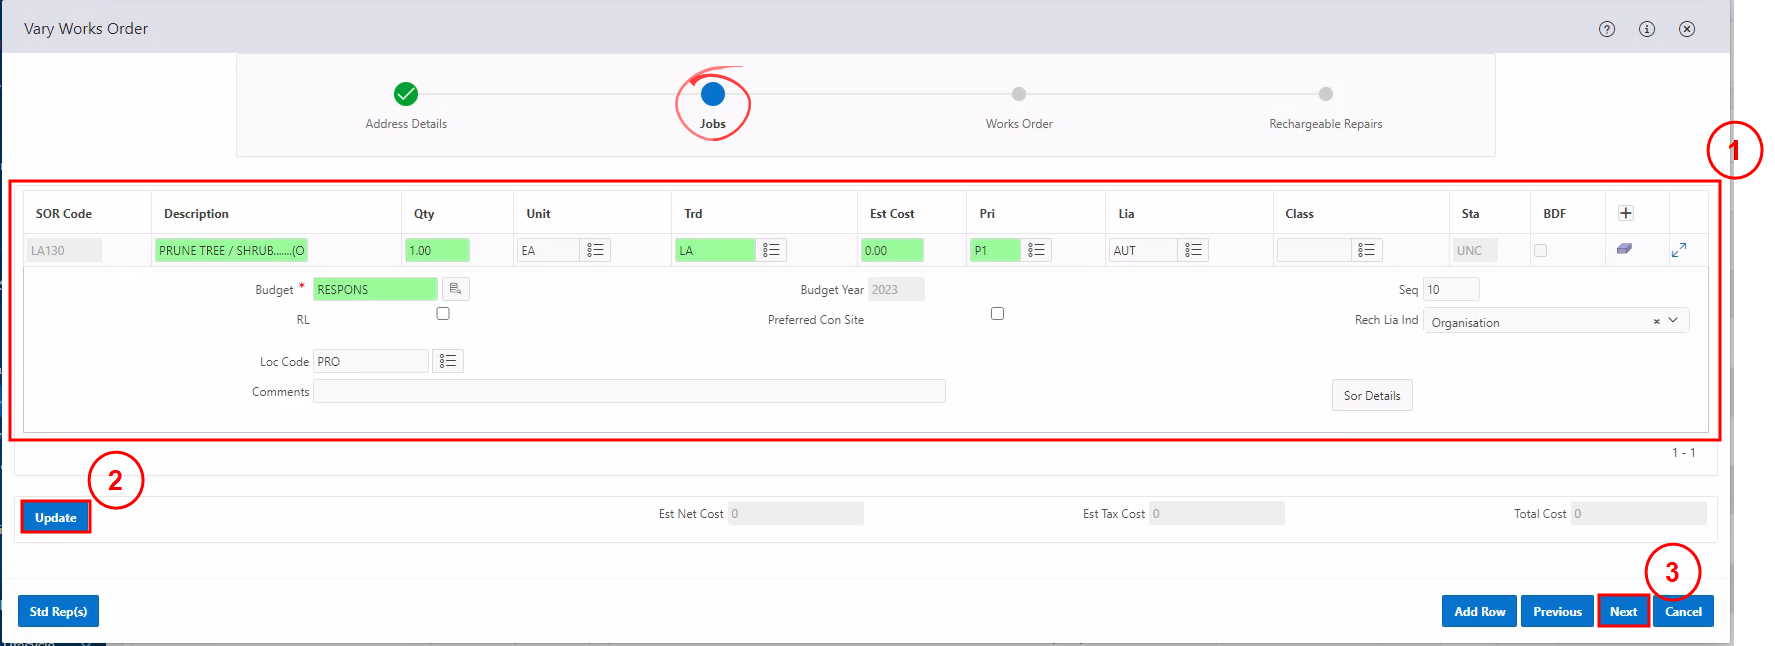
On the Jobs step, make the relevant changes to the existing Work Item. Select Update, then select Next.
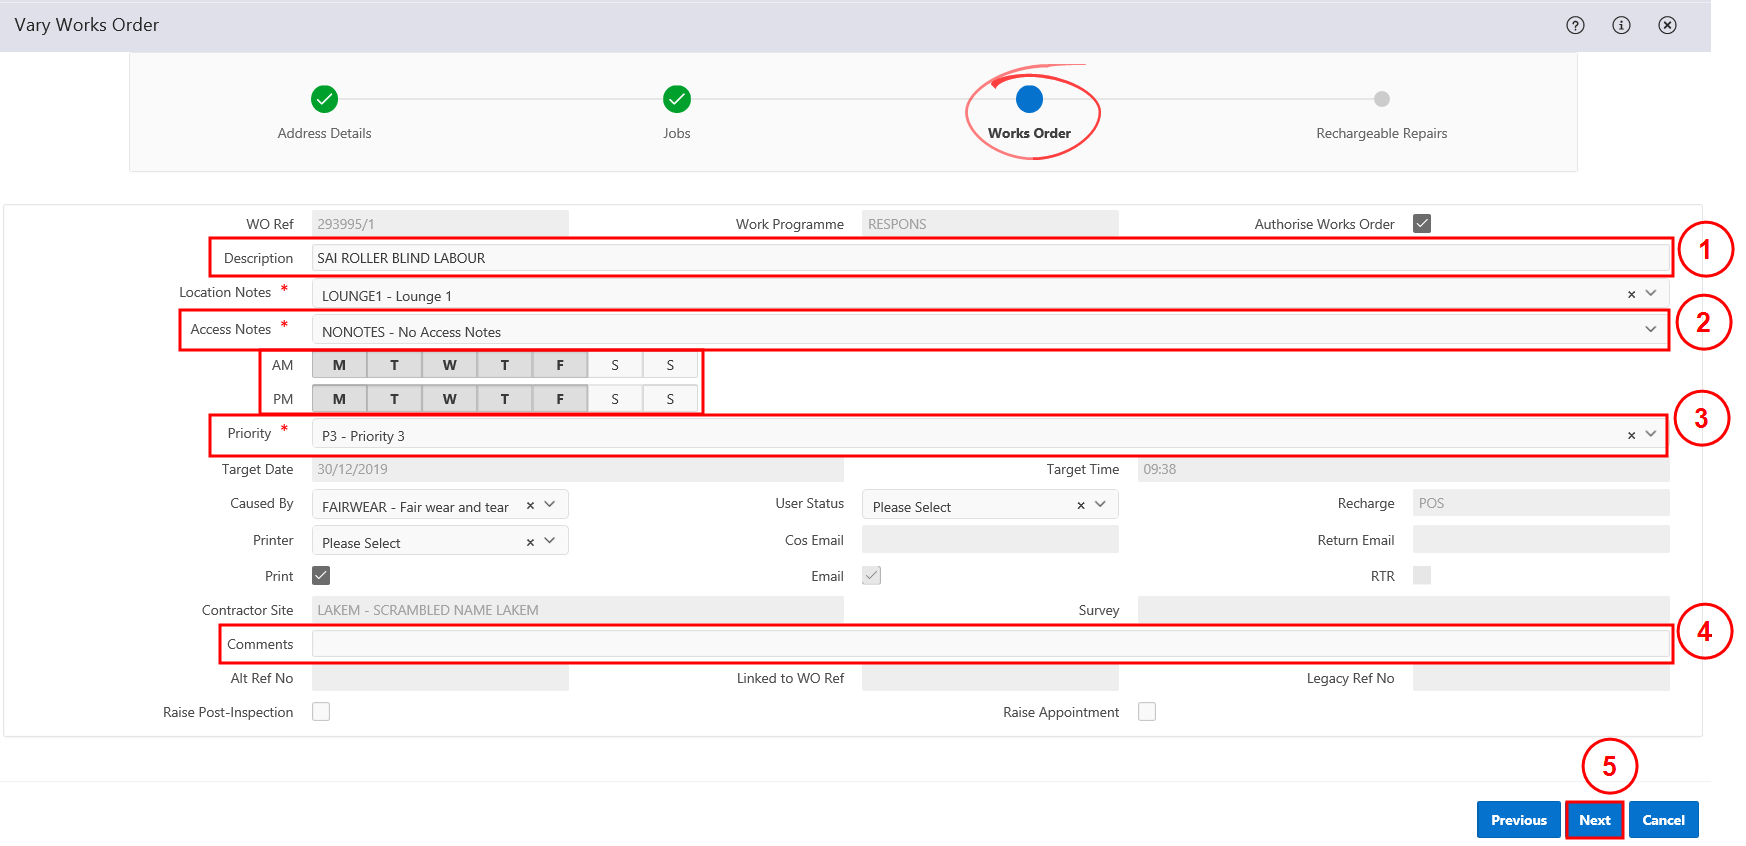
On the Works Order step, update the Description, Access Notes, Priority or Comments where required. Select Save or Next.
CAUTION - Please ensure no personal information including names and phone numbers are entered in the Description field. Any comments entered here will be visible on the tenant's Housing Connect account.
On the Rechargeable Repairs step, review and update the Lia Type, % Lia, Rech Reason or Account No where required. Select Save.
The Work Item has now been updated.
 If the works order displays with a status of RAI, the relevant Works Orders - Authorise Variation Request task will be sent to the relevant delegate for authorisation prior to being sent to the contractor for completion.
Search for the relevant Works Order ( Search and View a Works Order).
Select the Row Action Icon next to the Works Order and select Vary a Works Order.
On the Address Details step, select the reason for the variation from the Variation Reason drop-down. Enter any additional notes in the Comments box, then select Next.
On the Jobs step, select Add Row. Enter or search the SOR Code in the new row. Select the Expand Icon to expand the added Work Item and select the location from the Loc Code field. Select Update, and then select Next.
On the Works Order step, update the Description, Access Notes, Priority, or Comments where required. Select Save or Next.
CAUTION - Please ensure no personal information including names and phone numbers are entered in the Description field. Any comments entered here will be visible on the tenant's Housing Connect account.
On the Rechargeable Repairs step, review and update the Lia Type, % Lia, Rech Reason or Account No where required. Select Save.
The new Work Item has been added.
If the works order displays with a status of RAI, the relevant Works Orders - Authorise Variation Request task will be sent to the relevant delegate for authorisation prior to being sent to the contractor for completion.
Only complete the relevant steps below.
CAUTION - Notes added via this process will be automatically communicated to the contractor.
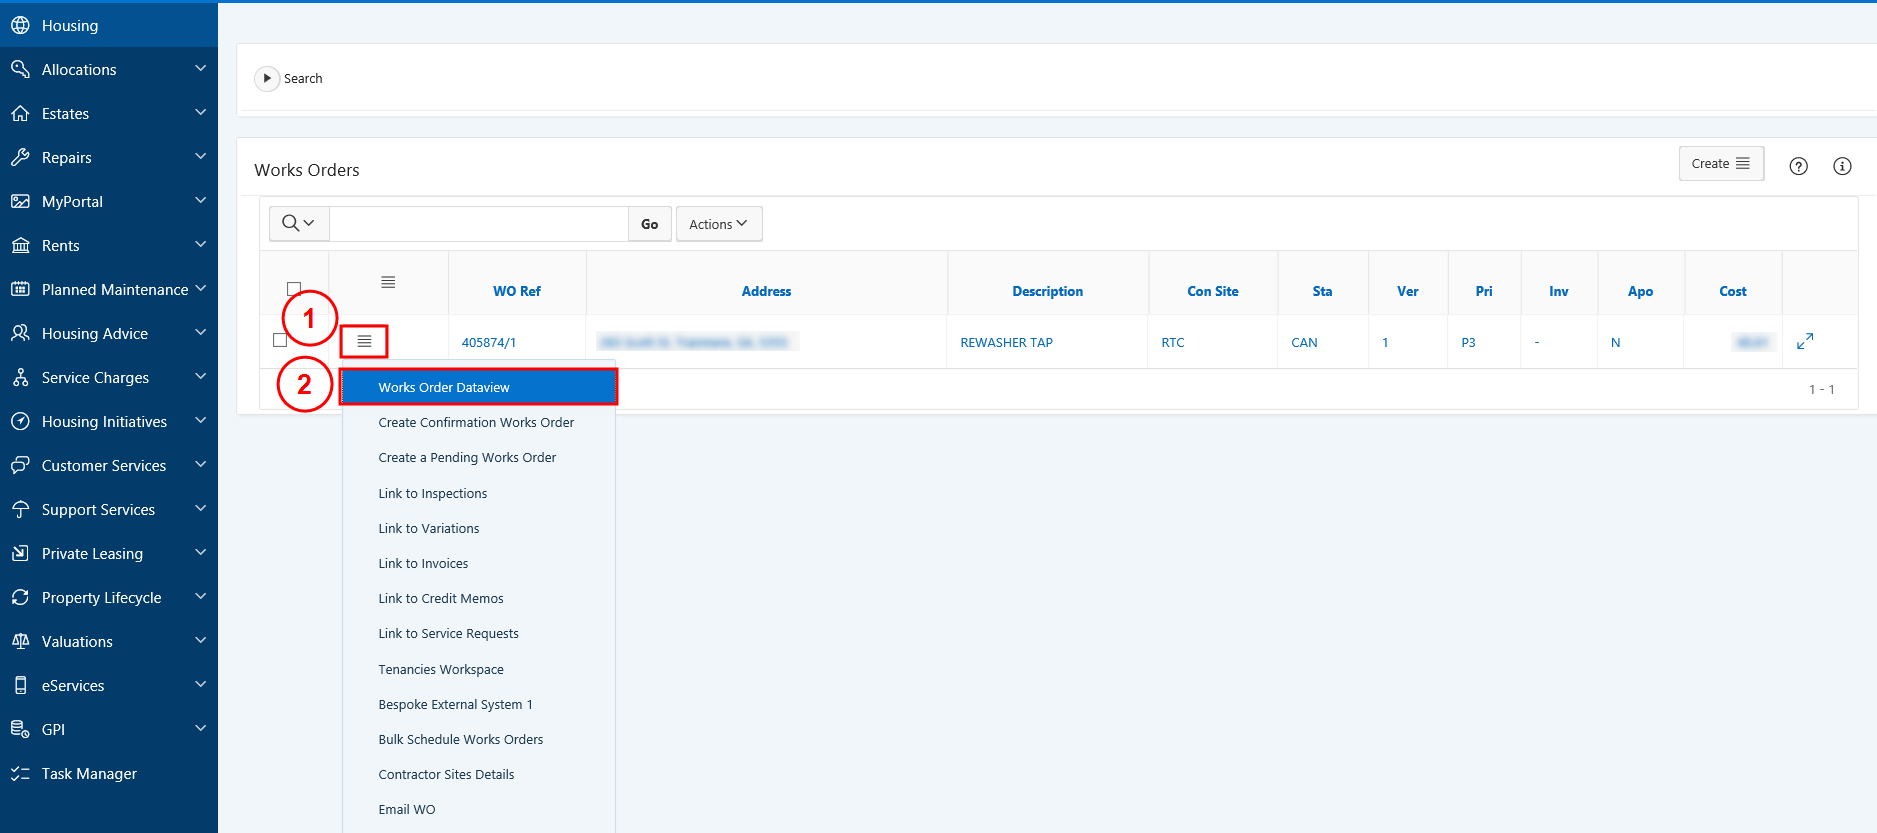
Search for the relevant Works Order ( Search and View a Works Order).
From the Works Order search, select the Row Action Icon next to the work order and select Works Order Dataview.
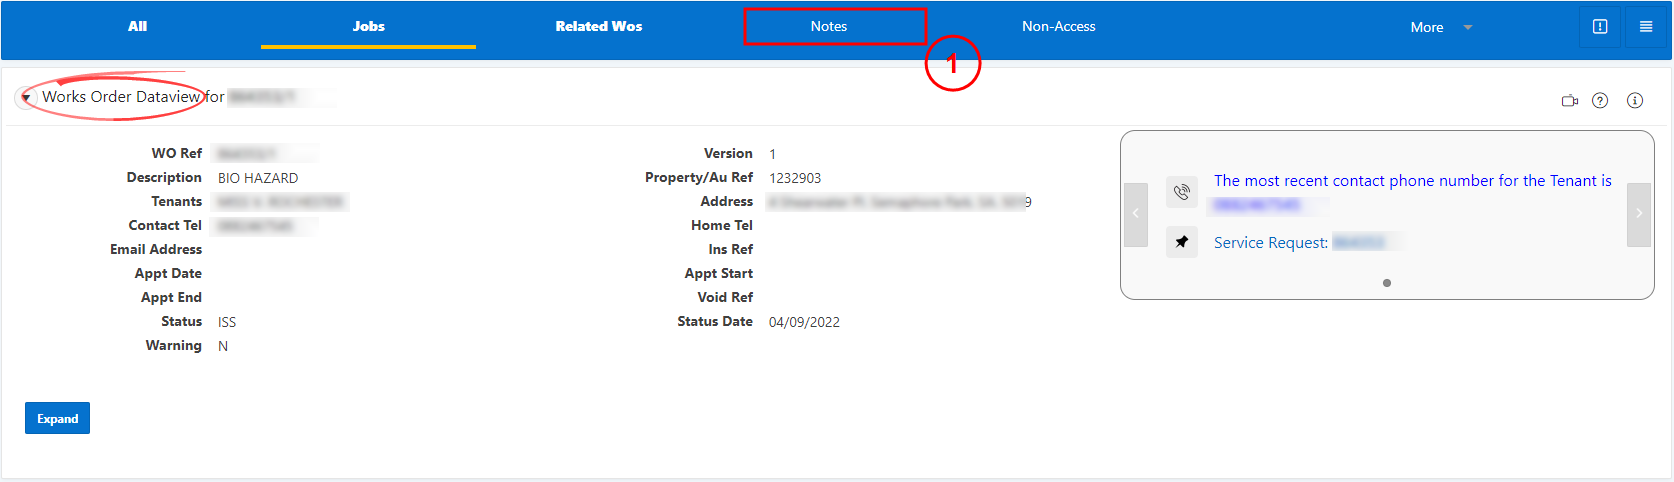
From the Works Order Dataview screen, select Notes from the top navigation links.
From the Notes region, select Create and then Create Notepad Entry.

On the Create Notes window, enter the updated information in the Text field. Select the Note Type from the drop-down and select Save.
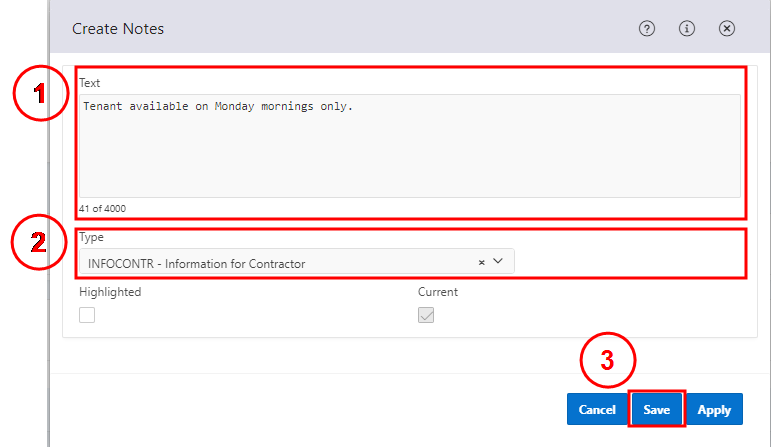
The note will display in the Notes region and will be sent to the contractor.

CAUTION - Information added via this process will NOT be automatically communicated to the contractor and are for SA Housing Trust use only.
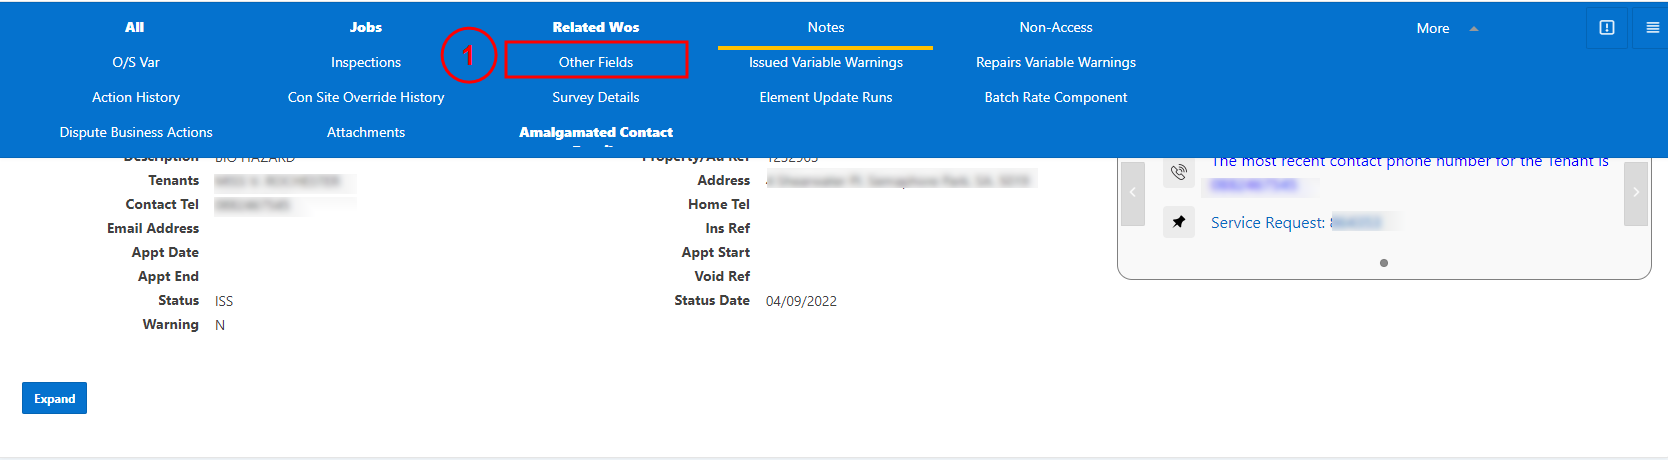
Search for the relevant Works Order ( Search and View a Works Order).
From the Works Order search, select the Row Action Icon next to the work order and select Works Order Dataview.
From the Works Order Dataview screen, select Other Fields from the top navigation links.
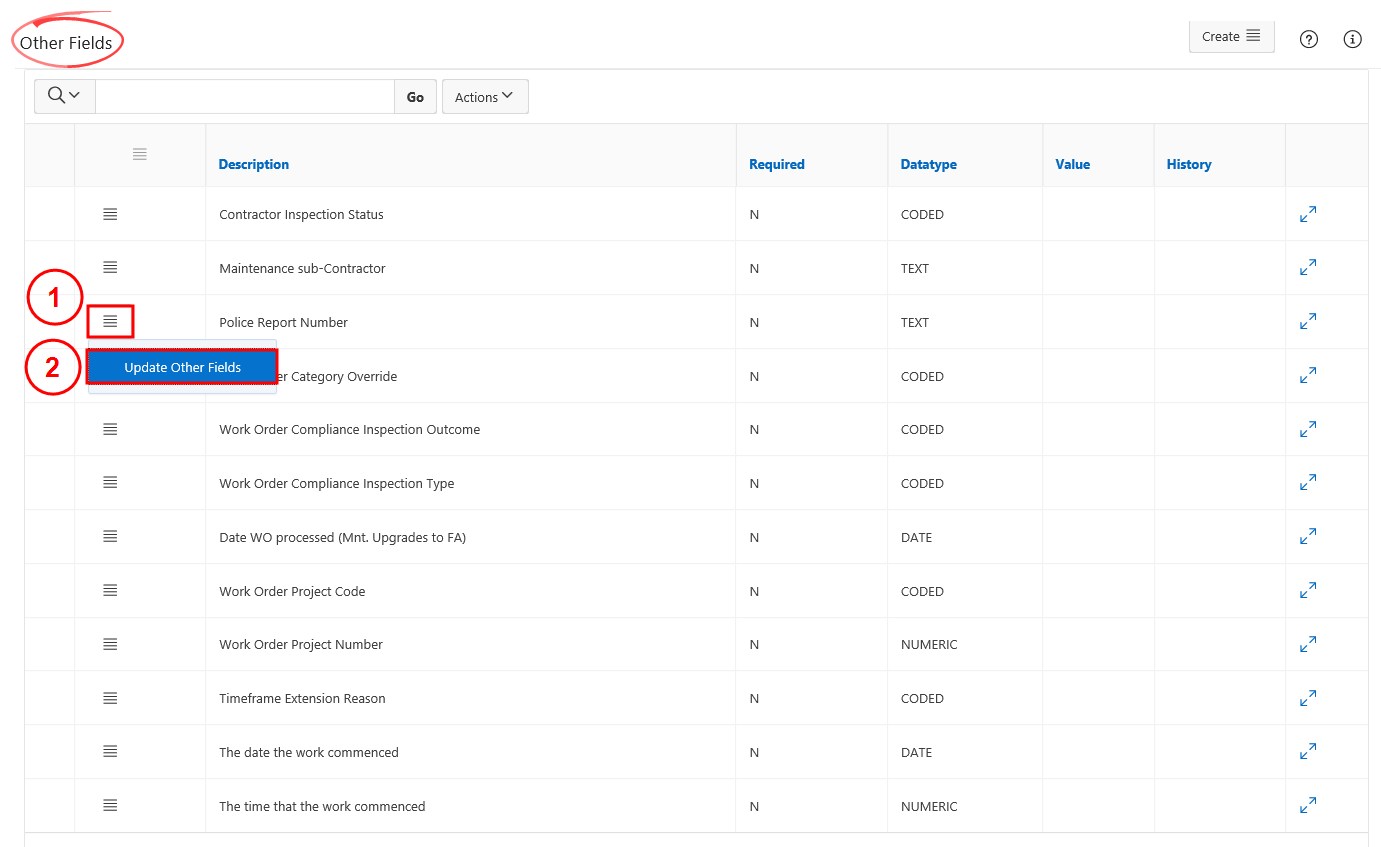
Scroll down to the Other Fields region. Select the Row Action Icon next to the field to be updated and select Update Other Fields.
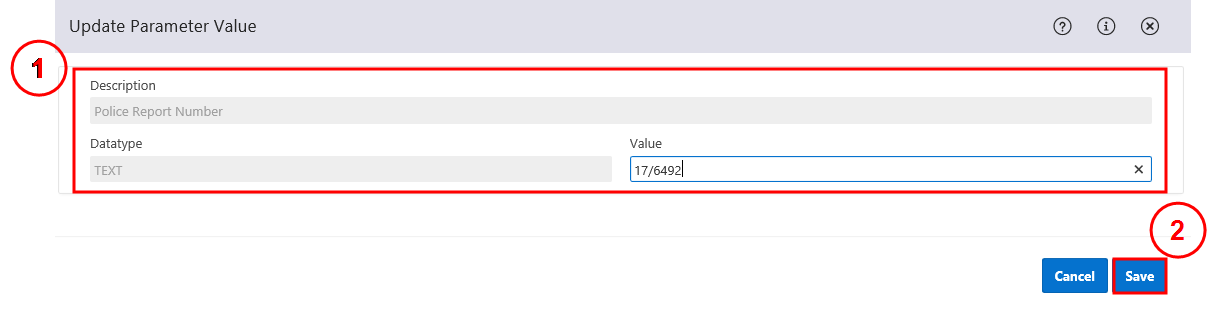
Complete the Update Parameter Value window by adding the required information, then select Save.
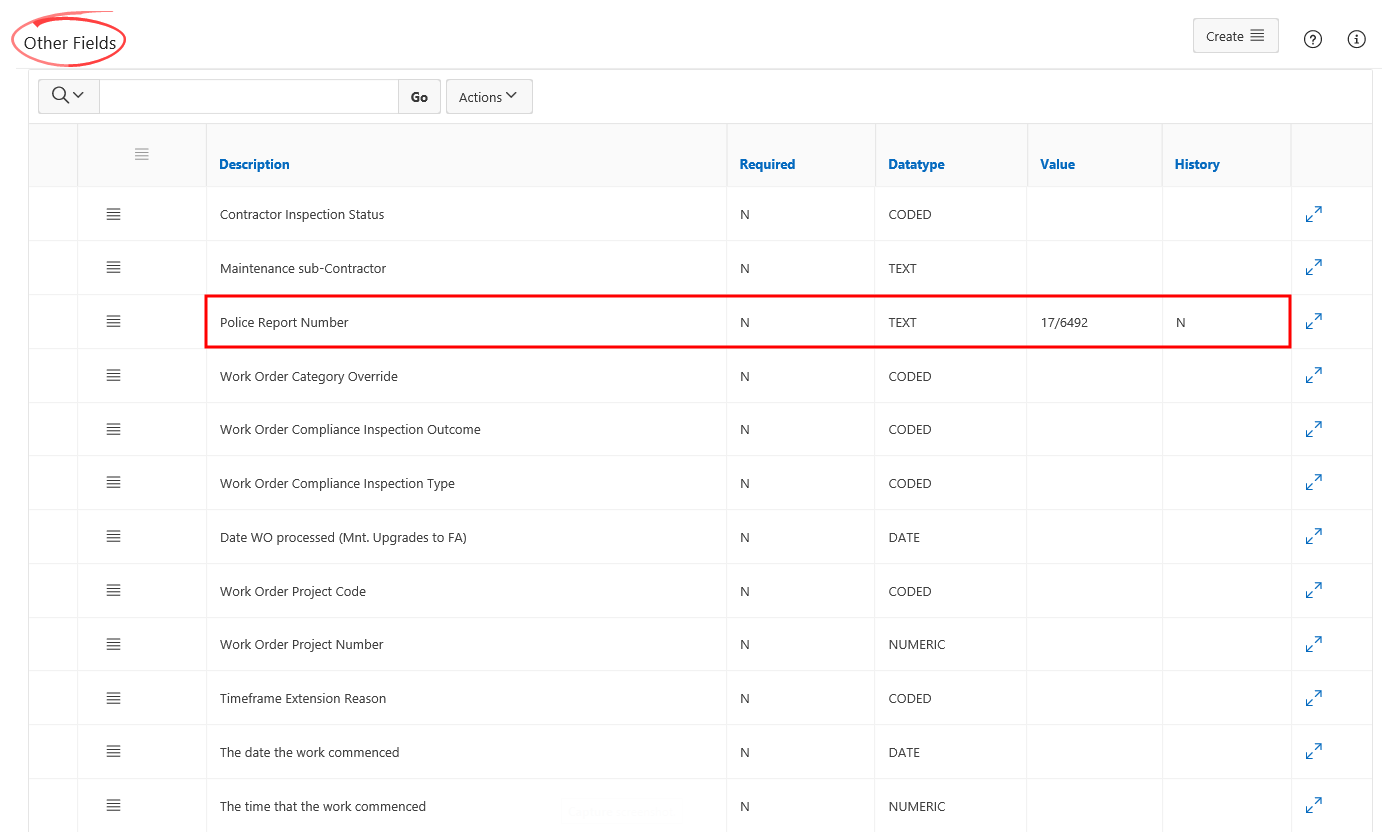
The information has been updated next to the relevant field.
CAUTION - A works order can only be copied between records of the same type e.g. property to property or admin unit to admin unit.
Raise the initial works order on one of the required properties or admin units ( Raise a Works Order).
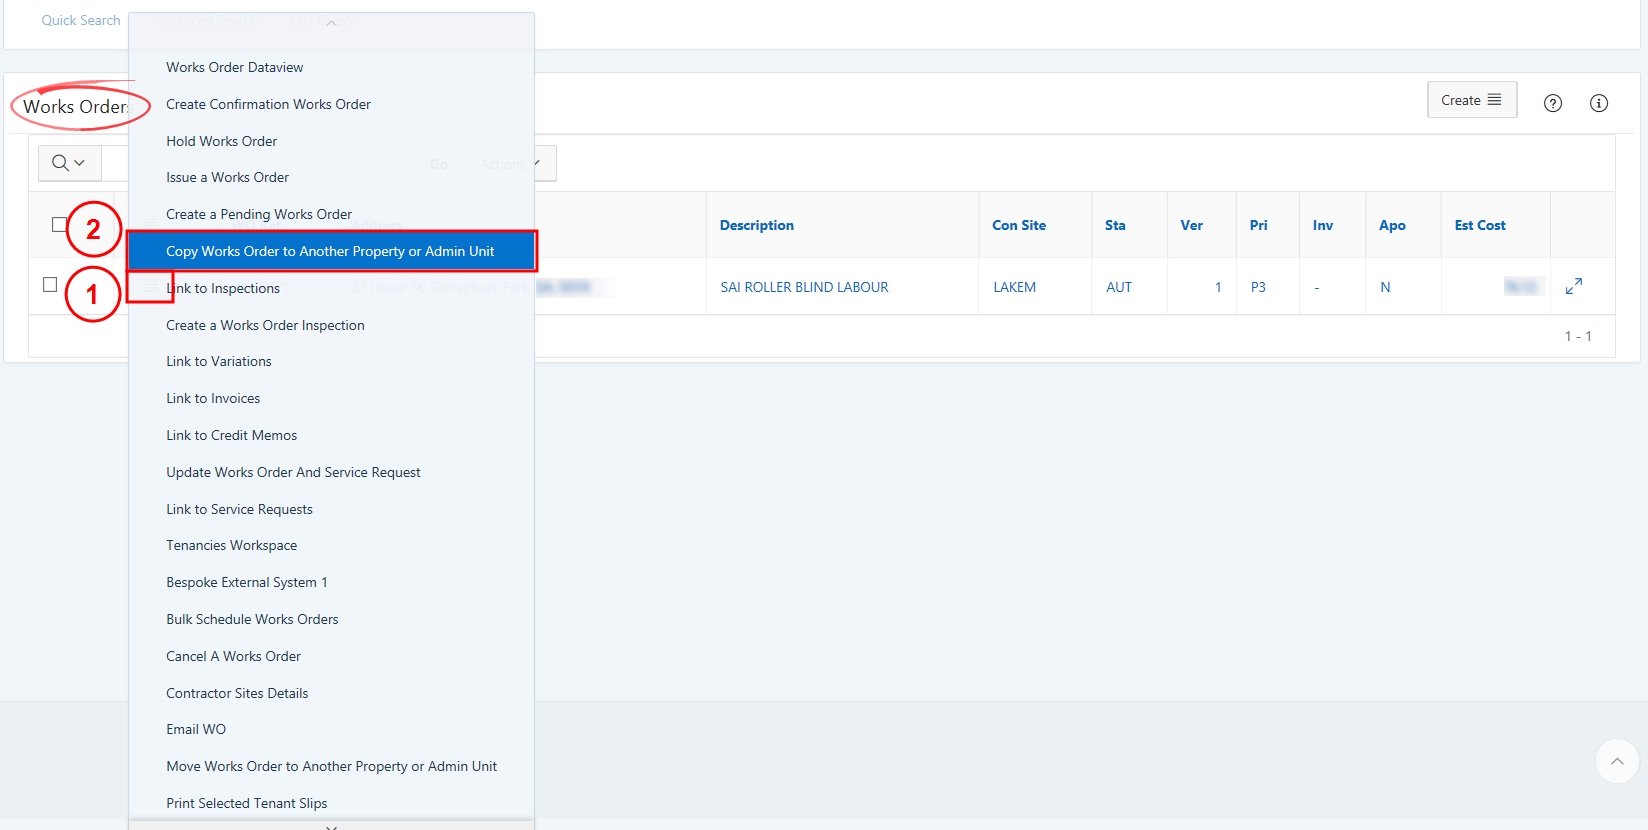
From the Works Order region, select the Row Action Icon for the works order and select Copy Works Order to Another Property or Admin Unit.
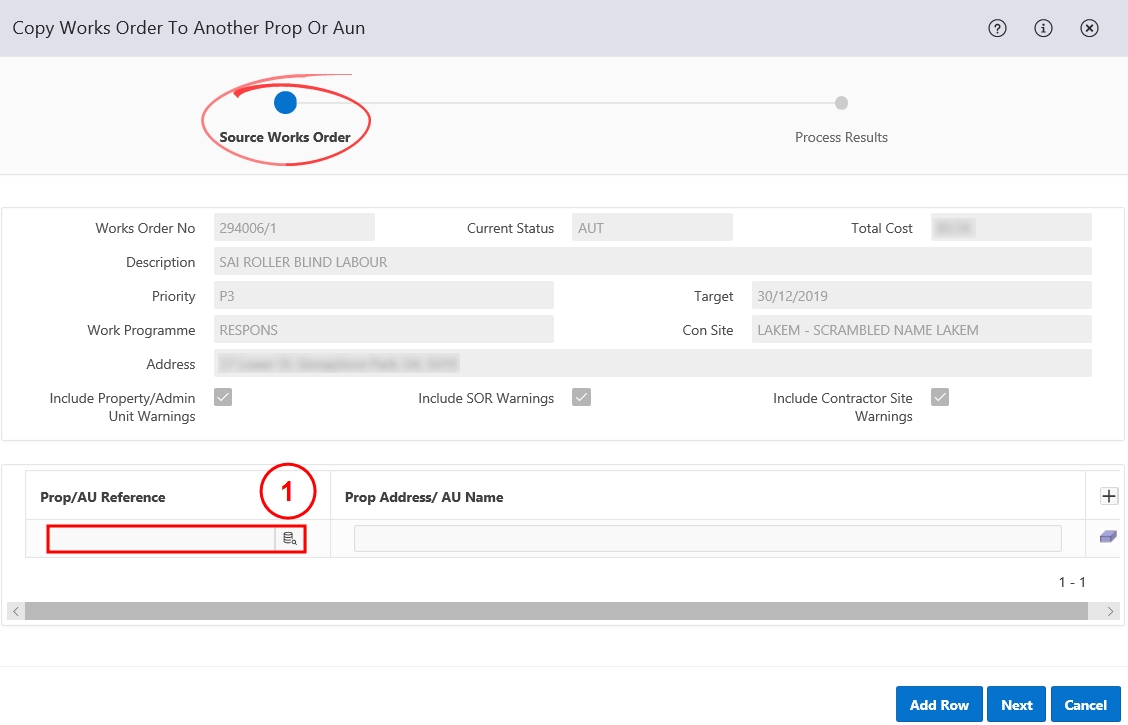
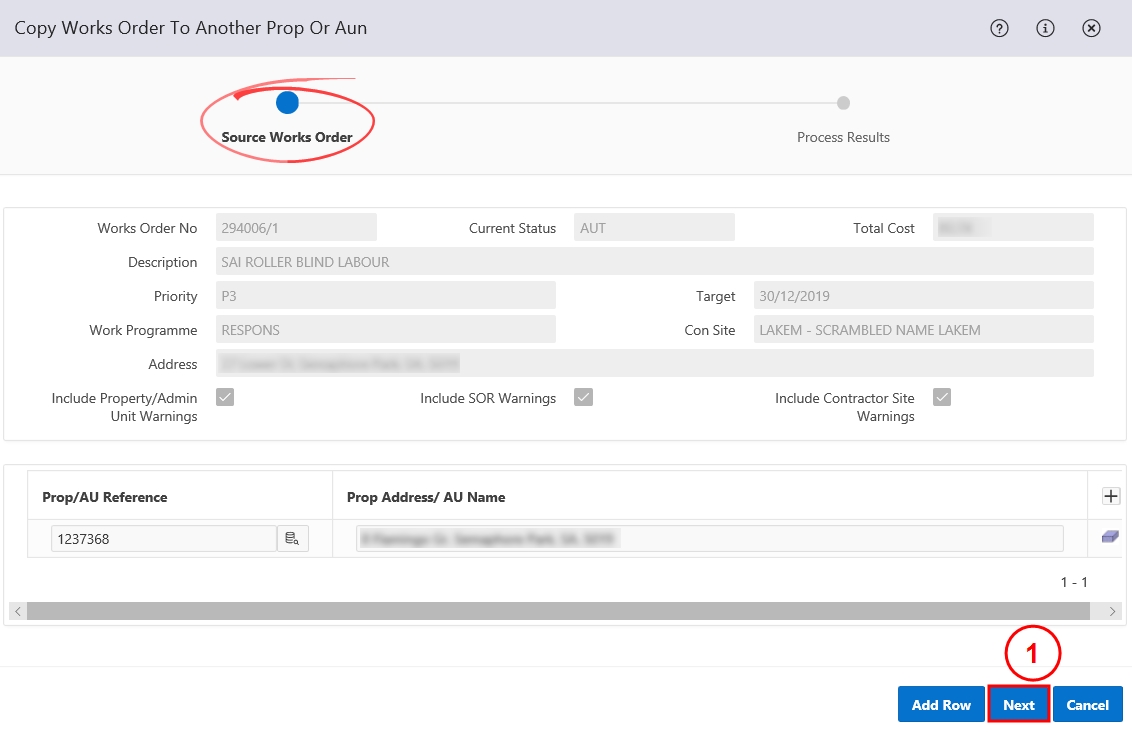
On the Source Works Order step, select the Search Icon in the Prop/AU Reference field.
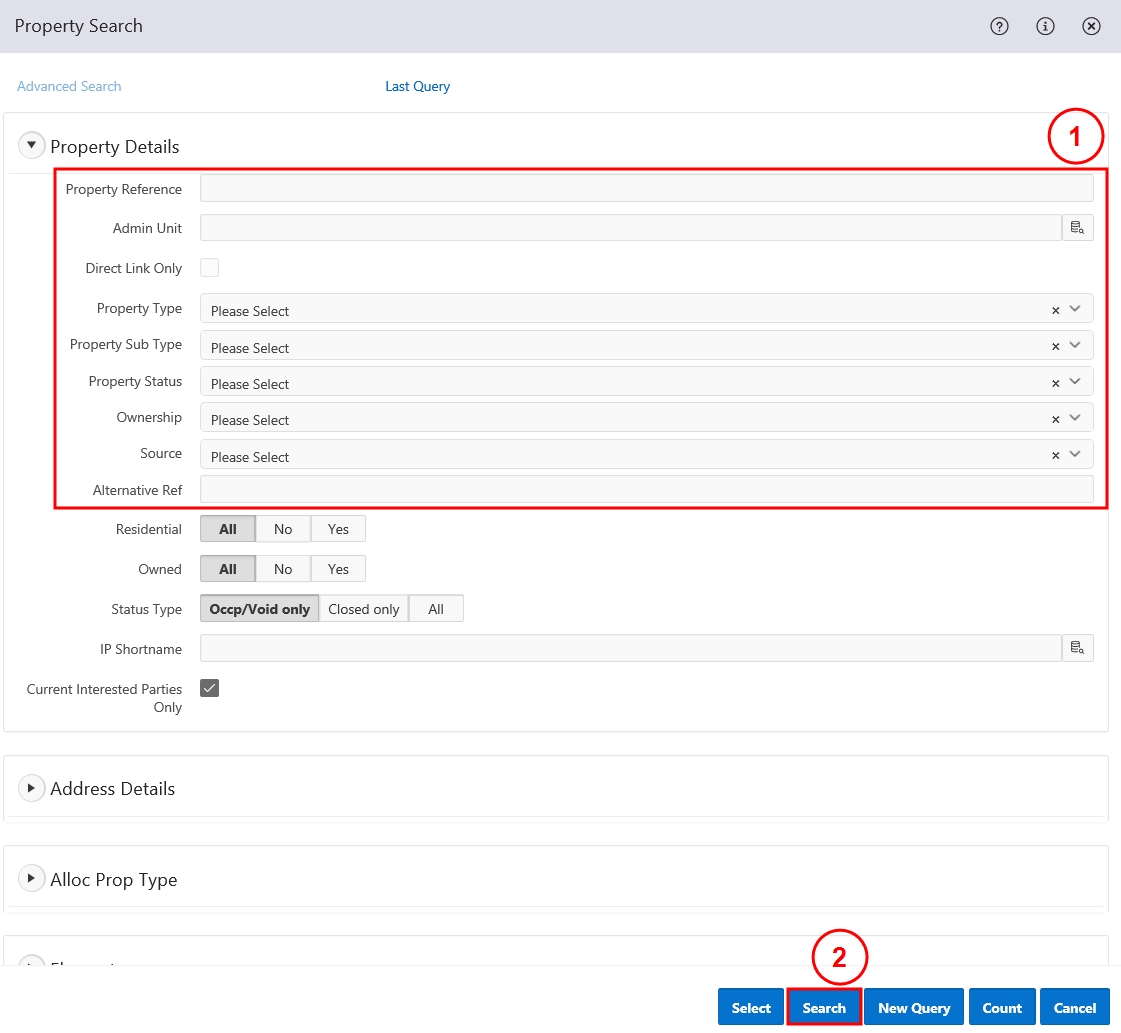
Search for the relevant property or admin unit using the search fields and select Search.
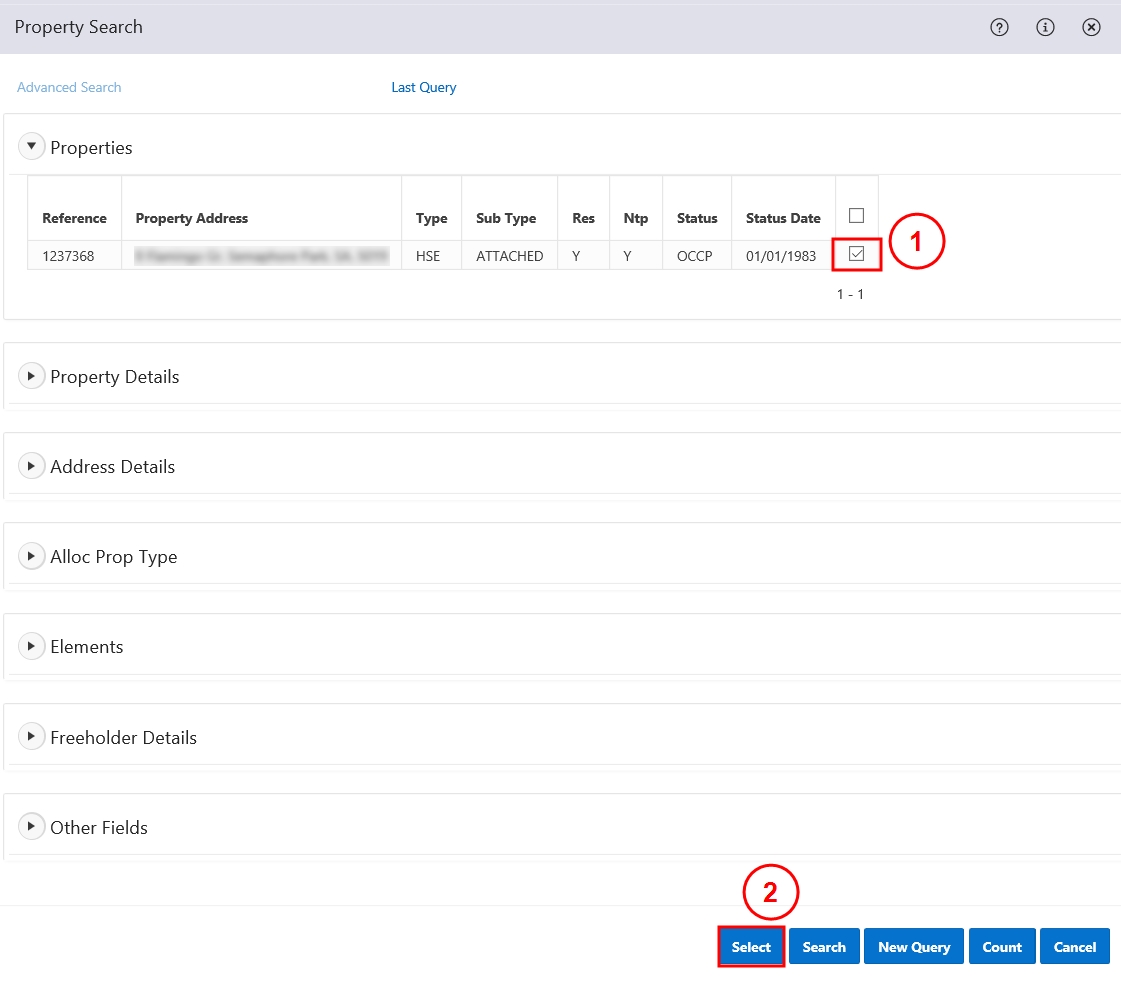
Select the tick box for all of the relevant properties or admin units for the works order to be copied to. Select Select.
On the Source Works Order step, select Next.
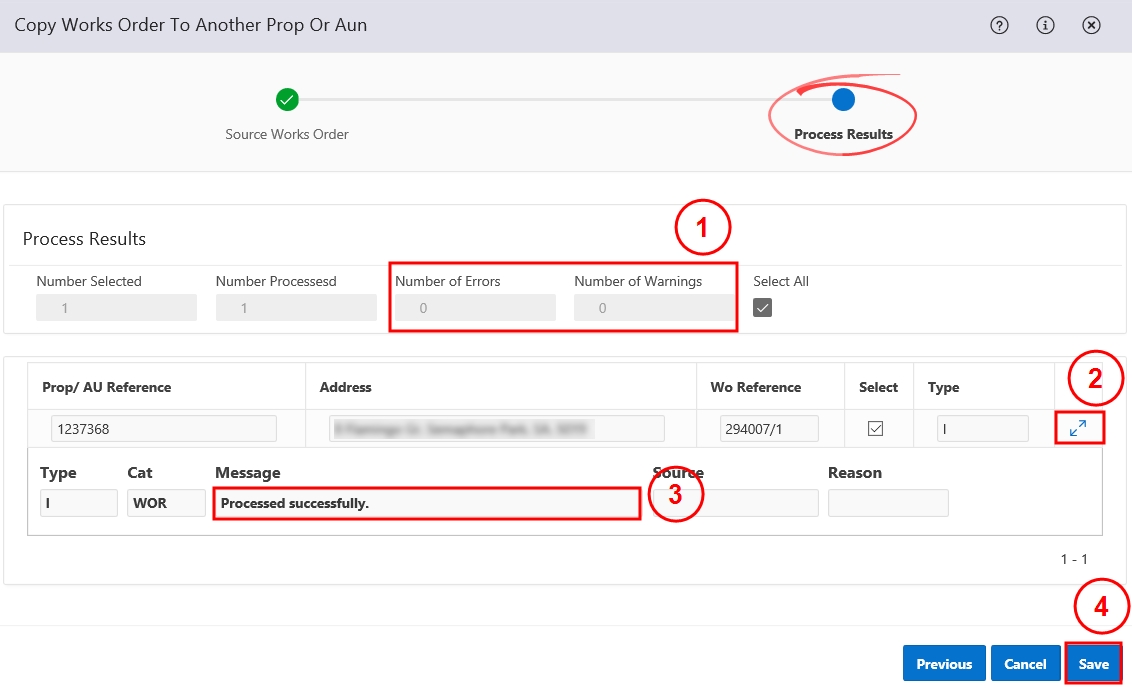
On the Process Results step, review if any errors or warnings have been raised in the Number of Errors or Number of Warnings fields. If an error or warning is indicated, select the Row Action Icon to view the error or warning in the Message field.
CAUTION - If any errors are raised, the works order will not be able to be copied.
Select Save.
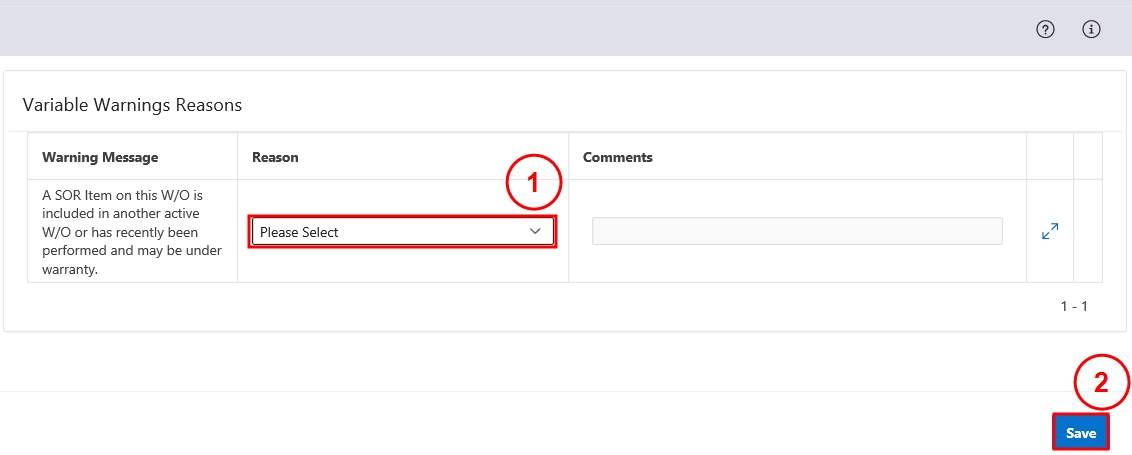
If any warnings were raised, the Variable Warnings Reason window will open. Select the reason for overriding the warning from the Reason drop-down. Select Save.
The works order has been copied to the selected properties or admin units.
Please refer to the Works orders procedures, Gas and electrical procedures, Check and report procedures and Maintenance accommodation standards.
CAUTION - Works orders with Priority 0 (P0) cannot be varied.
Retrieve the relevant Work Orders - Authorise Work Order task (Task Manager - View a Task) OR
Search for the Works Order ( Search and View a Works Order).
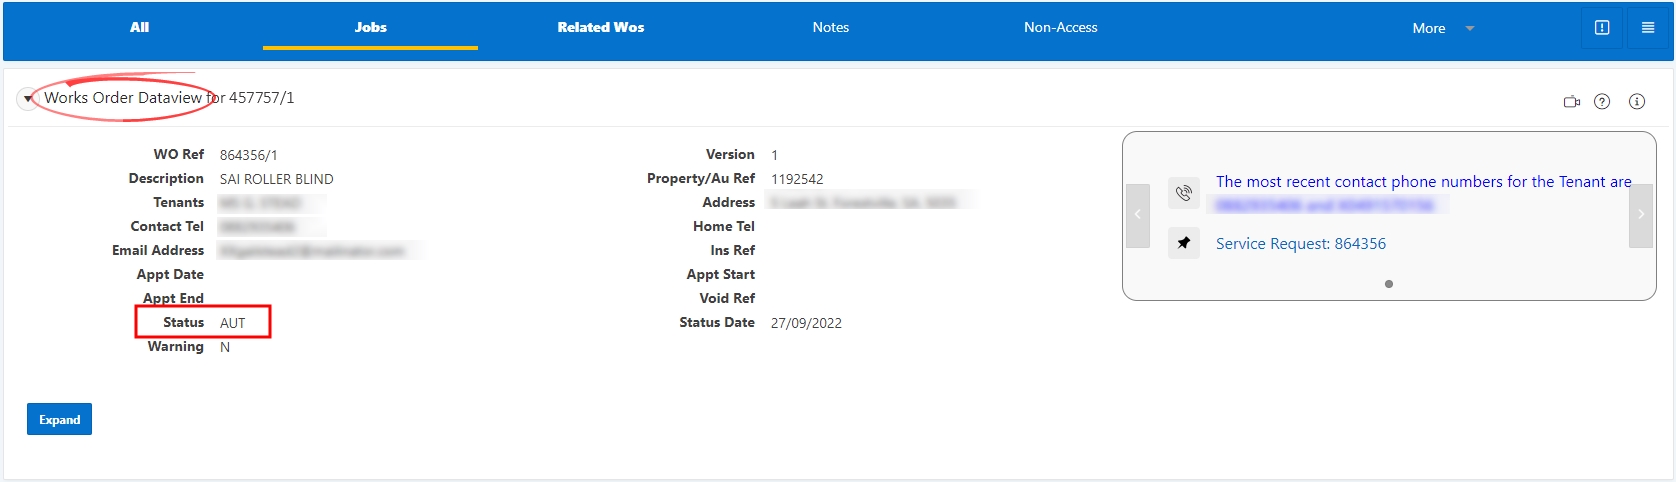
On the Works Order Dataview screen, review the details of the works order in the Jobs region. Select the Expand Icon to view further information as required. Then select the Actions Icon. The Actions menu will display. Select Authorise a Works Order.
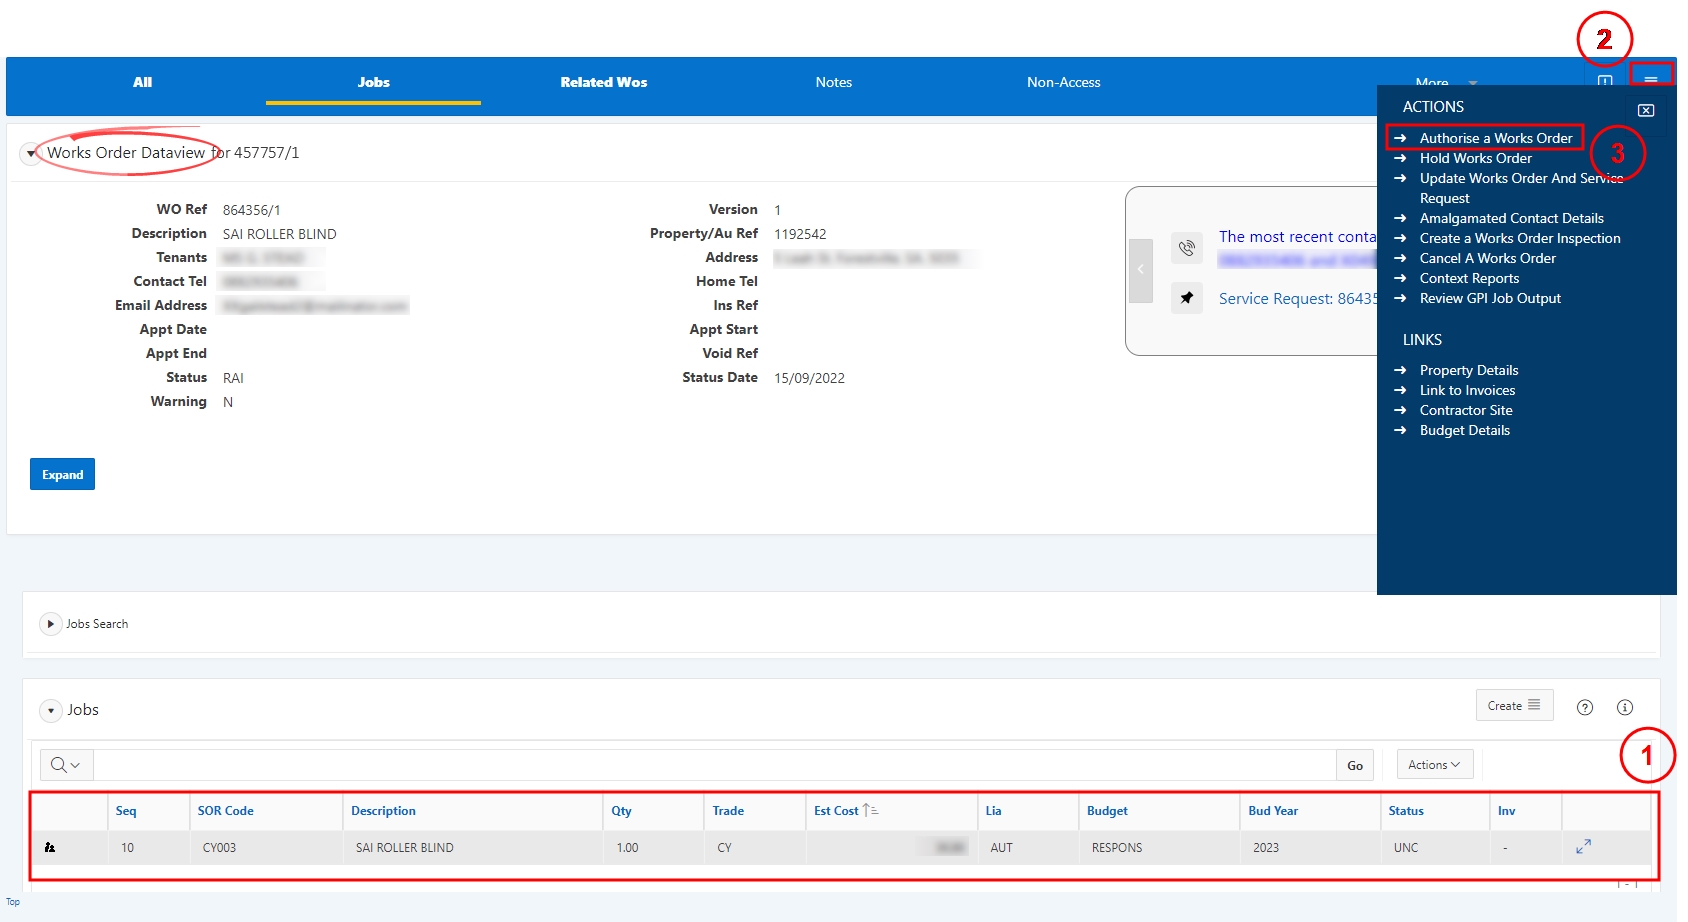
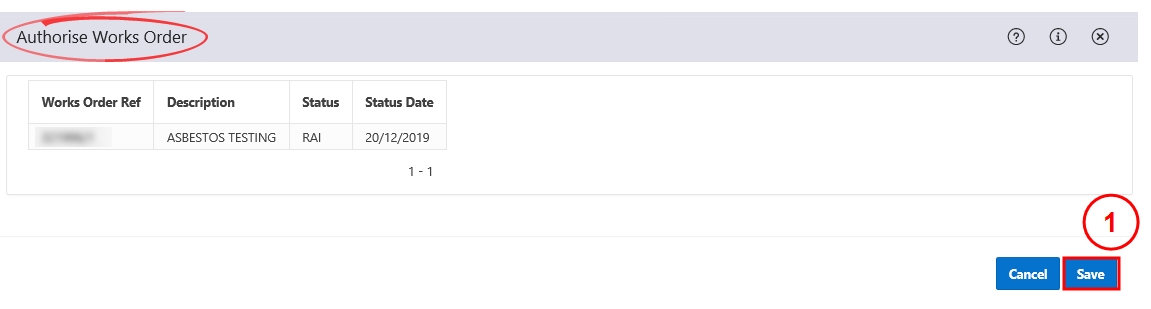
On the Authorise Works Order window, select Save.
The works order has been authorised and the status will display as AUT on the Works Order Dataview screen.